Typography - Task 3: Type Design & Communication
16/5/2023 - 26/6/2023 (Week 7 - Week 13)
Katelyn Tan Kye Ling (0354148)
Bachelor Of Design In Creative Media (Typography)
Task 3: Type Design & Communication
LECTURES
All 6 lectures were completed in Task 1 - Exercise 1 & 2 (Lecture Notes)


WEEK 9 - Lecture 9 (30/5/2023)

INSTRUCTIONS

Recognising Typographic Illusions
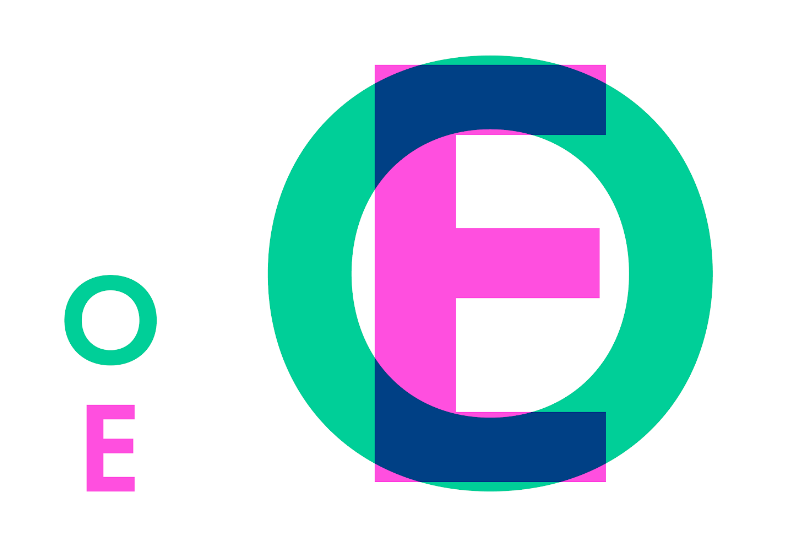


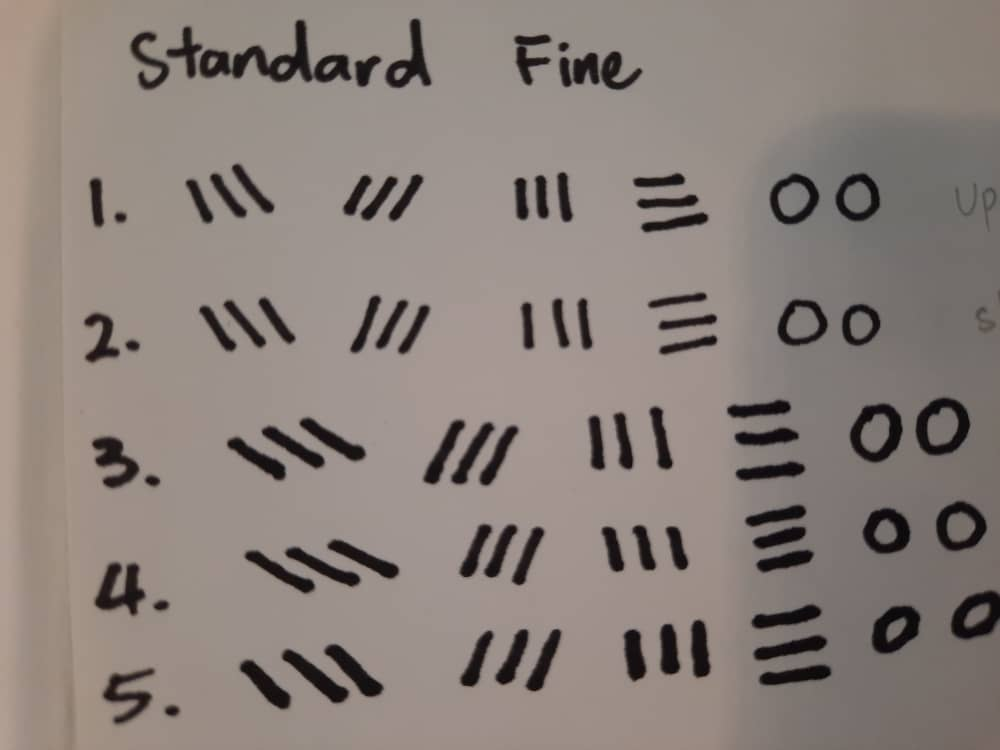


 Fig. 3.5 Dual Pen Tool - 5 different angles (20/5/2023)

3. Letter Deconstruction


Digitalised letters k,g,r and l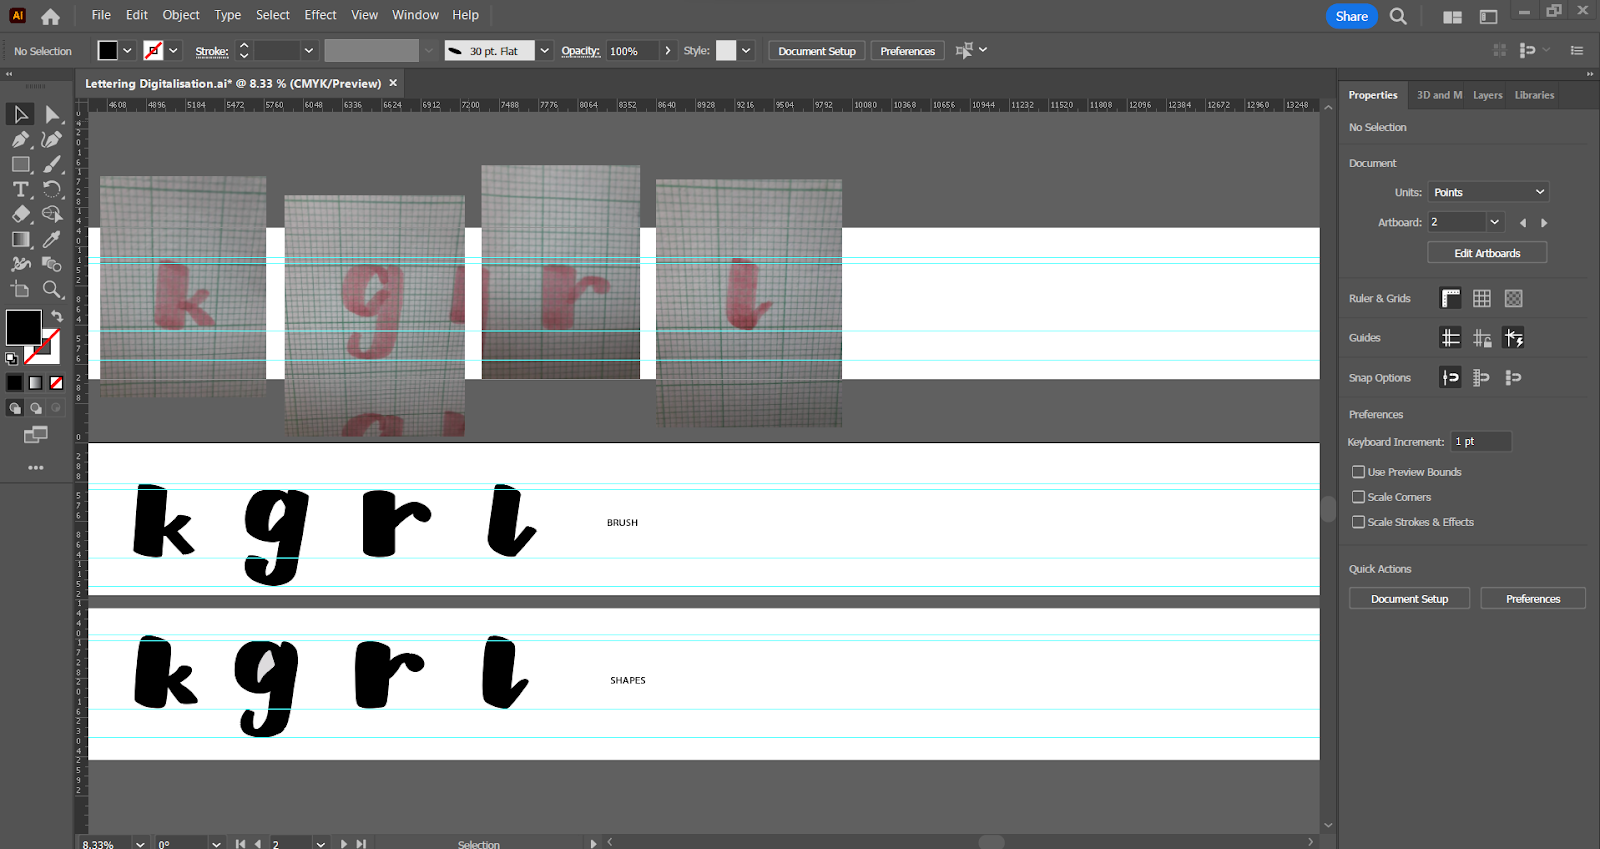


 Fig. 5.10 Refined Digitalised Letters (2) (Without Guidelines) (13/6/2023)


Finalised Digitalised Letters:

I first watch the lectures from Mr. Vinod to understand how to use fontlab. However, my font letters were not the same size as the ones in Adobe Illustrator. I tried many many times to correct it but it still did not work.
Became way too large:


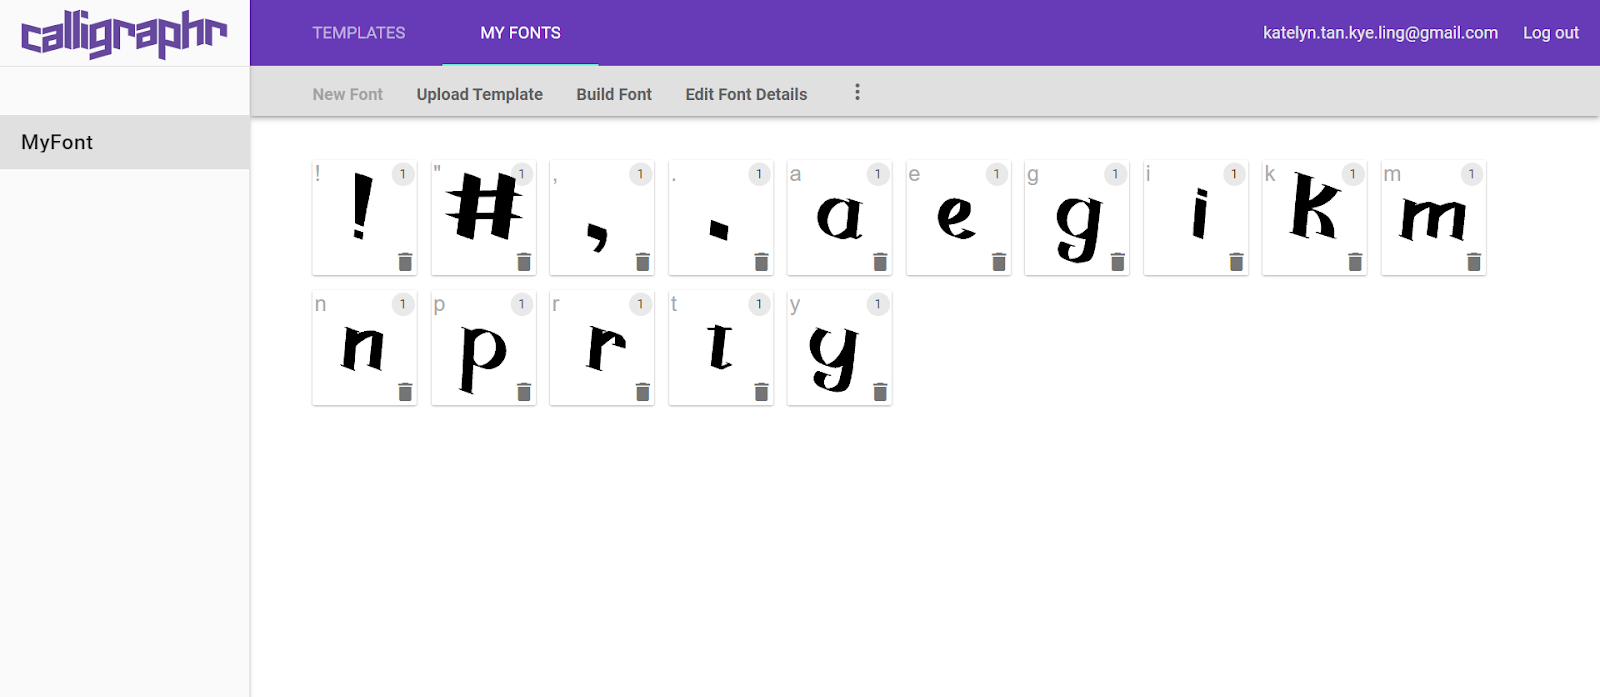
 Fig. 6.5 Calligraphr Fonts #3 (17/6/2023)
Uploading template:
Fontlab (2nd Attempt)


After that, I proceeded to do kerning for each letter.

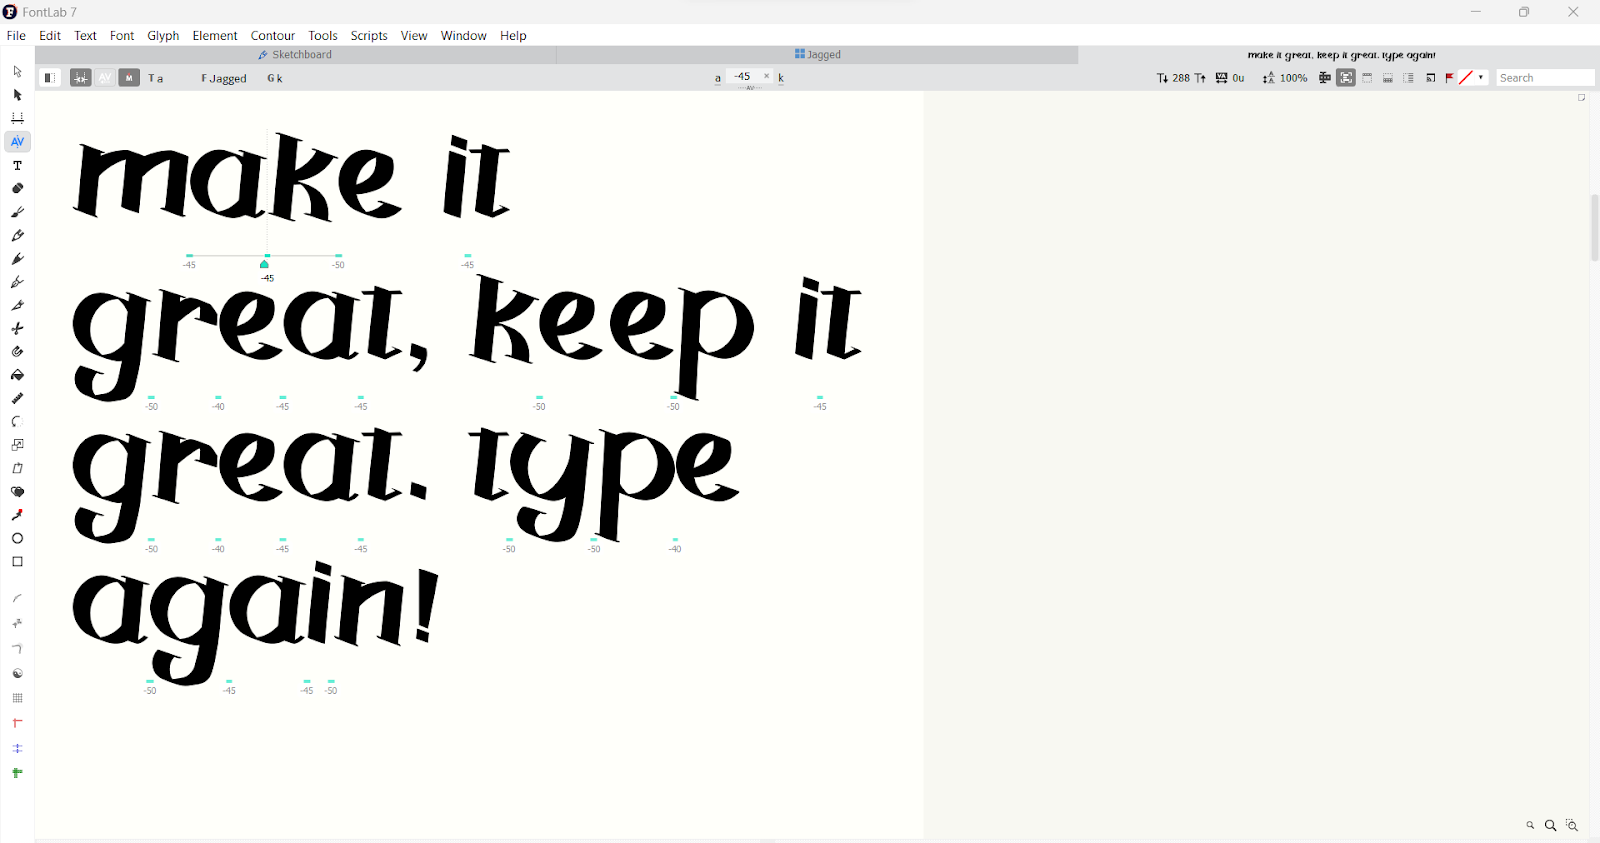 Fig. 6.10 Letters after kerning (20/6/2023)
Attempt 1: (All using fonts done in Calligraphr)

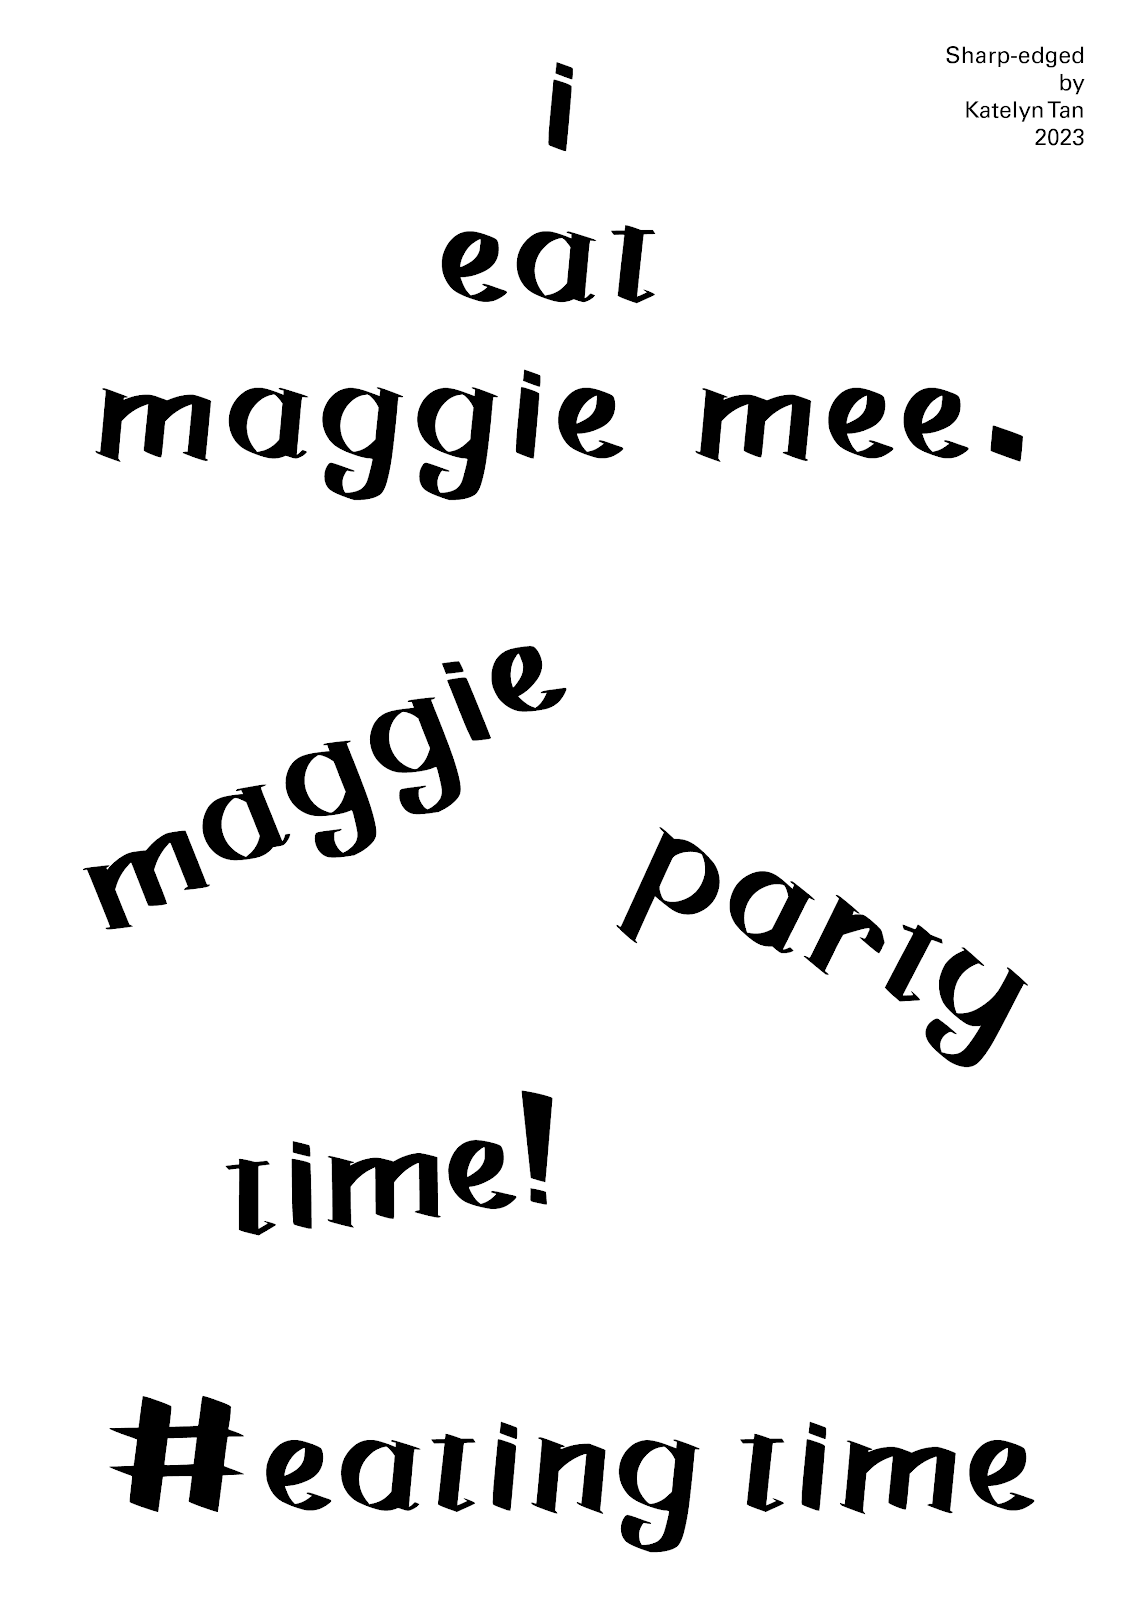
 Fig. 7.3 Poster #3 - Attempt 1 (17/6/2023)
Attempt 2: (All using fonts done in Fontlab)

 Fig. 8.2 "Jagged Regular" - Final (JPEG) (19/6/2023)

REFLECTION
OBSERVATIONS
FURTHER READING


WEEK 7 - Lecture 7 (16/5/2023)
We first posted up our task 2 work in Facebook for the record. Mr. Vinod then proceeded to introduce our third and final task to us. Lastly, he gave us an exercises relating to task 3. It was to use 5 different pen tools to write strokes and letters.
Fig. 1.1 In Class Exercise
WEEK 8 - Lecture 8
This week was independent learning week therefore there was no lectures. Our task for this week was to choose our favourite writing tool along with our favourite writing stle/angle and submit it by commenting under a post on Facebook.
Fig. 1.2 Final Decision
WEEK 9 - Lecture 9 (30/5/2023)
Mr. Vinod first started by showing us how he chooses which hand written letter to digitalis out of many hand written letters written on the practice paper. He then gave us a tutorial on how to digitalis our hand written letters - 3 ways. The ways were: Brush, Shapes and the Width tool. Later on, he let us try digitalising our own hand written letters for the rest of the class.
WEEK 10 - Lecture 10 (6/6/2023)
As usual we first uploaded our progress onto a Facebook post for the record. Then Mr. Vinod proceeded to do a one to one check up on each student's digitalised letters. He gave a lot of feedback and even taught us individually on how to fix our work.
WEEK 11 - Lecture 11 (13/6/2023)
At the start of the class, we did something different today. We had to check each other's e-portfolio and give feedback to each other. After that, Mr. Vinod gave us feedback on our final digitalised letters. After that, we were given time to correct our digitalised letters or start working in Fontlab. We were also allowed to let Mr. Vinod check our work again. Lastly, Mr. Vinod gave us a short tutorial on how to do letter kerning in Fontlab.
WEEK 12 - Lecture 12 (20/6/2023)
At the start of the class, we posted our posters to get feedback from Mr. Vinod. After that he gave us time to fix our posters. Then he asked everyone to walk around and look at each other's posters, it felt like an art gallery to me:) After that, we continued our work on our own and ended class.
WEEK 13 (27/6/2023)
NO lecture, Mr. Vinod had a talk in Singapore.
Fig. 1.3 Evidence that there's no class
INSTRUCTIONS
For Task 3A, we are to design the letters: a e t k g r i y m p n . , ! #
We will start with rough sketches, explore a variety of options and upon approval begin digitization of the drawings—software for digitization Adobe Illustrator and later FontLab. The purpose of this assignment is to develop student’s ability to construct a readable and legible font and also to design a font with consistent characteristics premised on research and analysis.
1. Research
Fig. 2.1 Type Anatomy
Even though all letters seem to be the exact same height, the round shapes are actually slightly bigger. The intersection of the O, for example, with the baseline and cap height is just a single point. While the intersection of the letter E, for example, touches those lines with its full surface. Because both letters are technically the same size, they will seem disproportional. We need to overshoot the O a little in order to make them visually equal.
Fig. 2.2 Typographic Illusions
If you know anything about calligraphy, you know that the upstrokes are thin, the downstrokes are thick and the cross strokes are thin again. This rule needs to be applied to even the most simple and geometric letters, like the letter T for example.
Fig. 2.3 Typographic Illusions
Reference:
Bonn L. (2020) Typography design 101: a guide to rules and terms. 99 designs. https://99designs.com/blog/tips/typography-design/
2.Sketches
- 1 tool 5 different writing styles (5 different tools)
Fig. 3.1 Round Pen Tool - 5 different angles (20/5/2023)
Fig. 3.2 Standard Fine Pen Tool - 5 different angles (20/5/2023)
Fig. 3.3 Pentel Pen Tool - 5 different angles (20/5/2023)
Fig. 3.4 Brush Pen Tool - 5 different angles (20/5/2023)
- 1 favourite writing style out of the 5 writing styles (All 5 different tools)
Fig. 3.6 5 different tools with favourite writing style (20/5/2023)
I then used my dual brush pen (chosen tool) to write out my letters with the writing style I chose:
Fig. 3.7 Sketch (28/5/2023)
Out of the 10 type faces Univers LT Std was closest to my sketch as it is more rounded. Therefore I used that as my reference.
Fig. 4.1 Deconstructed "m" (Univers LT Std) (29/5/2023)
Fig. 4.2 Deconstructed "t" (Univers LT Std) (29/5/2023)
Fig. 4.3 Deconstructed "r" (Univers LT Std) (29/5/2023)
After deconstructing the letters, I noticed most distance between symmetrical letters are quite the same. I've also noticed that even though some strokes look very straight, they can actually be slightly slanted. Example for the letter "r", the straight stroke isn't exactly straight. Also the letter "m" and "t" have overshoots.4.Digitalisation
Attempt 1
During week 9's class after Mr. Vinod gave a tutorial on how to digitalis hand written letters, I started to digitalis my letters. I did the letters a, e and t all in lowercase using the brush method as well as the shapes method.
Fig. 5.1 Digitalisation Progress (30/5/2023)
Fig. 5.2 Digitalisation Progress (31/5/2023)
Digitalised letters y,m,p and n
Fig. 5.3 Digitalisation Progress (2/6/2023)
Digitalised Letters:
Fig. 5.4 All Digitalised Letters (2/6/2023)
Attempt 2
After Mr. Vinod's feedback session, I had lots of changing and corrections to do. I first had to redo my whole set of letters because the width and the angle of the letter wasn't the same. I also did not follow the guide lines correctly. Therefore I found a picture online to use as a letter guide line reference.

Fig. 5.6 Digitalised Letters (Without Guidelines) (7/6/2023)
Fig. 5.7 Digitalised Letters (With Guidelines) (7/6/2023)
Refined Digitalised Letters (1):
Fig. 5.8 Refined Digitalised Letters (1) (Without Guidelines) (9/6/2023)
Fig. 5.9 Refined Digitalised Letters (1) (With Guidelines) (9/6/2023)
Refined Digitalised Letters (2):
After another feedback session from Mr. Vinod, I had quite some things to change.
Fig. 5.11 Refined Digitalised Letters (2) (With Guidelines) (13/6/2023)
Refined Digitalised Letters (3):
Once again, of course I made a mistake. I mistaken my letter "i" for "l" and did the letter "l" instead of "i". Therefore I immediately changed it.
Fig. 5.12 Refined Digitalised Letters (3) (Without Guidelines) (14/6/2023)
Fig. 5.13 Refined Digitalised Letters (3) (With Guidelines) (14/6/2023)
After putting my letters in Fontlab, I noticed some error in the letters and went back to Adobe Illustrator to correct it.
Fig. 5.14 Final Digitalised Letters (Without Guidelines) (20/6/2023)
Fig. 5.15 Final Digitalised Letters (With Guidelines) (20/6/2023)
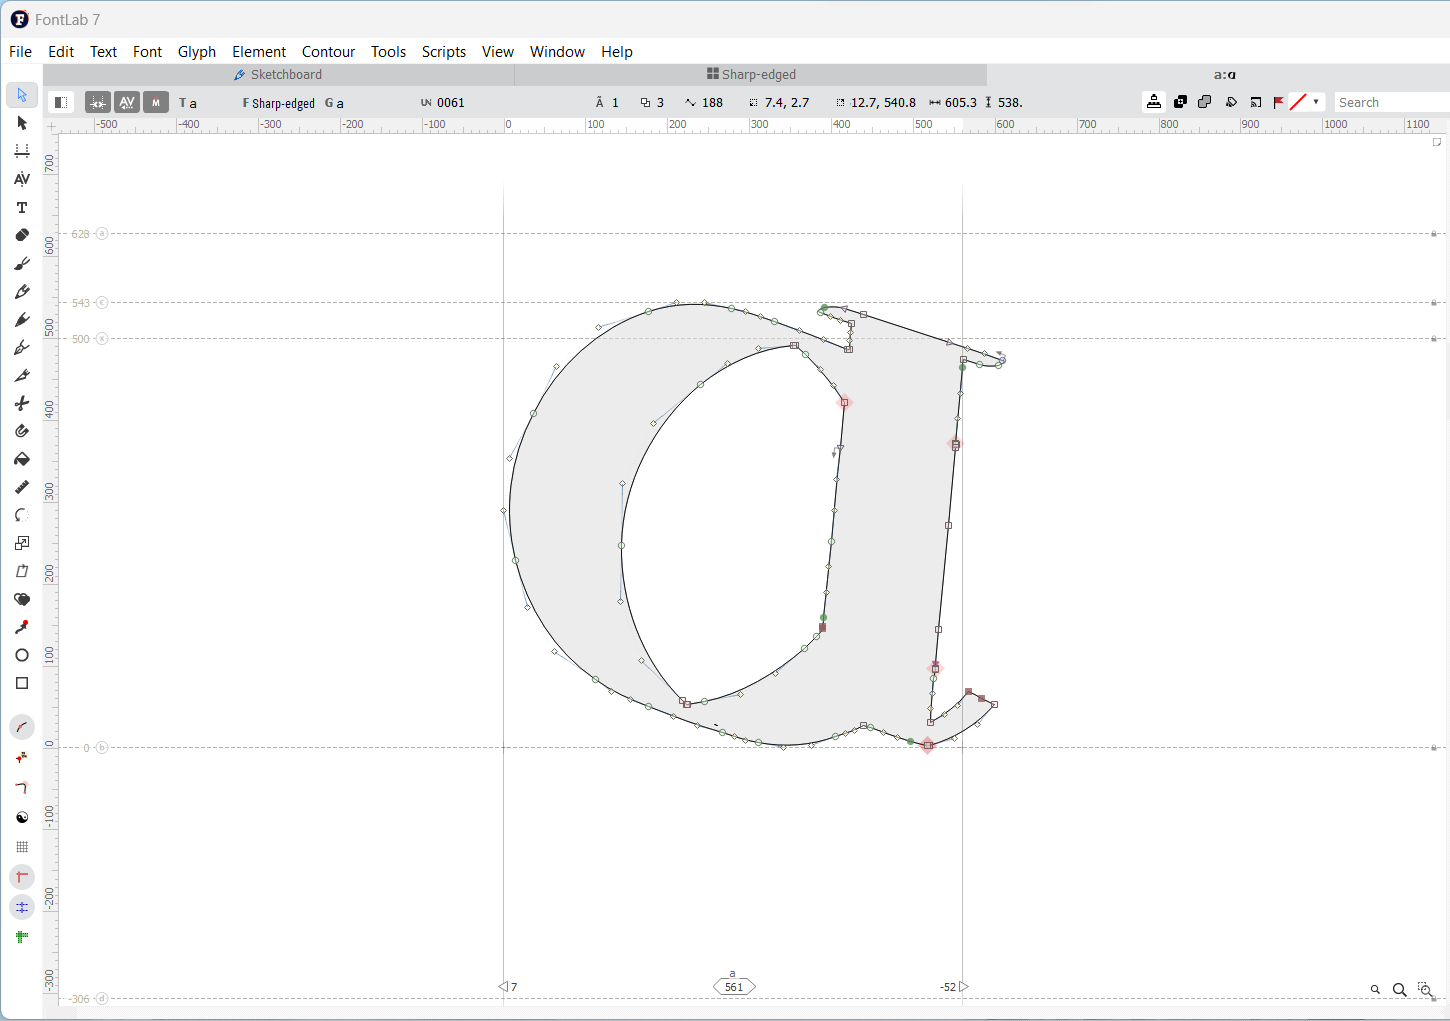
5. Fontlab/Calligraphr
Fontlab
Here are some examples:
Supposed to be at 500 median line:
Fig. 6.1 Letter "a" font lab (15/6/2023)
Fig. 6.2 Punctuation "." font lab (15/6/2023)
Calligraphr
After so many attempts, I decided to try the second option which was Calligraphr. It worked much better and was way easier to work on.
Putting letters onto template:
Fig. 6.3 Calligraphr Fonts #1 (17/6/2023)
Fig. 6.4 Calligraphr Fonts #2 (17/6/2023)
Fig. 6.6 Uploading fonts (17/6/2023)
Fontlab (2nd Attempt)
After going to class, I asked my friend for help and she saw the mistake I did in Fontlab. It was a really silly mistake. I forgot to turn on some of the paste & duplicate preferences.
Fig. 6.7 Paste & Duplicate Preferences
Putting all my letters from illustrator to fontlab.
Fig. 6.8 Character map (20/6/2023)
Fig. 6.9 Letters after kerning (20/6/2023)
6. Poster
Fig. 7.1 Poster #1 - Attempt 1 (17/6/2023)
Fig. 7.2 Poster #2 - Attempt 1 (17/6/2023)
After the feedback session, I did my poster again. I changed the sentence entirely.


Fig. 7.4 Poster #1 - Attempt 2 (17/6/2023)
Fig. 7.5 Poster #2 - Attempt 2 (17/6/2023)
Fig. 7.6 Poster #3 - Attempt 2 (17/6/2023)
7.FINAL OUTCOME 3A: Type Design and Communication
Font Download Link:Screen Grab of "New Metrics Tab":
Fig. 8.1 Screen Grab of "New Metrics Tab"
Final Font:
Fig. 8.3 "Jagged Regular" - Final (PDF) (19/6/2023)
Final Poster:
Fig. 8.4 "Jagged Regular Poster" - Final (JPEG) (19/6/2023)
Fig. 8.5 "Jagged Regular Poster" - Final (PDF) (19/6/2023)
FEEDBACK
WEEK 8 - Type Design & Communication
General Feedback: Overall, all is good.
Specific Feedback: Practice writing in that style and later identify the best letters you can use for digitization (when instructed). For now keep practicing writing in that style.
WEEK 9 - Type Design & Communication
General Feedback: Choose the best letters written and digitalise them.
Specific Feedback: Choose letters that are in line, neat, symmetrical. Don't crop letters from the whole picture, take individual pictures of each chosen letter.
WEEK 10 - Type Design & Communication
General Feedback: Letters have to redo, don't have to follow the handwritten ones exactly.
Specific Feedback: Letters not on the correct guide lines, letters not symmetrical, letters all different width and angle.
WEEK 11
Type Design & Communication:
General Feedback: Many mistakes.
Specific Feedback: Letter “a”, “p” and “g” Cannot straight away use the letter “o” to make other letters, need to cut it.
Letter “r” needs to go up a little bit more.
Letter “t” looks weird.
Letter “n” needs to go higher as well for the connecting stroke.
Punctuation has to be fixed, strokes not aligned with the style of the letters.
E-portfolio:
General Feedback: Overall everything is good
Specific Feedback: Suggested to add jumplinks.
Specific Feedback: Suggested to add jumplinks.
WEEK 12
Type Design & Communication:
General Feedback: Composition and font size.
Specific Feedback: Size of all words have to be the same. Composition has problem, too much white space. Proportion of some words are too long and don't fit in with the rest of the words.
REFLECTION
EXPEREINCE
If I'm being honest, this experience was rather tough for me. There was lots of criticism and rejection throughout the process. There was problems every time even after correcting my previous mistakes. As this was my first time creating a font, everything was new to me. However, on the bright side, I did learn many things. Seeing my font type out on illustrator made me feel so happy, as if I achieved something huge!
OBSERVATIONS
Throughout this assignment I've observed and learnt many things. I've observed that one stroke can be used for many other letters. Also one angle has to be used for all similar strokes. Moreover I've also observed that one shouldn't follow their handwritten letters exactly, if oneself is stuck to that idea of the handwritten letters, it'll be hard to improve digitalising the letters. The digitalised letter may change and be different from the handwritten ones.
FINDINGS
I find that creating one typeface takes a lot of time and effort. Furthermore we were only asked to make a few letters, imagine making a typeface for the whole alphabet. I now know that it takes lots of effort and time and research to make a typeface which makes me appreciate typefaces more. I look and stare longer at fonts now to see how they were created,
FURTHER READING
1. Type Rules! the designer's guide to professional typography. Second Edition
Fig. 9.1 Type Rules! the designer's guide to professional typography. Second Edition
Chapter 11: Designing Your Own Typeface
Handwriting Fonts: A Good Place To Begin
These days, many of us use our computer for much of the writing we do, including invitations, journals, personal notes, and letters. Most typefaces are too formal for these projects, but a handwriting-style font will do nicely and maintain that personal, low-tech look.
Fig. 9.2 Handwriting Fonts
These handwriting fonts show the extreme diversity of this style of typeface. International Typeface Corporation’s (ITC) program to nurture and develop these kinds of designs has provided a wealth of new and interesting typography.
- The handwriting you select should be an unconnected, noncursive print, not a loopy, connecting script, which can create problems when letters are combined.
- Once you decide on a handwriting to use, the next step is to have each character written several times so you can pick the best one.
- It is best to gang up these characters on one or several 8 ½ x 11 inch sheets of paper or vellum to make them easier to scan later. Make sure you indicate a baseline, or you will have a lot of trouble later lining them all up in your font-manipulation software.
- Your artwork will then need to be scanned, converted into digital data with a program such as Adobe Illustrator, and imported into a font production program such as Fontlab or Fontographer.
2. The Complete Manual of Typography, Second Edition
Fig. 9.3 The Complete Manual of Typography, Second Edition
Chapter 8: What Makes Good Type Good (and Bad Type Bad)
Well-set type doesn’t draw attention to itself, so it’s often hard to see
what’s gone right in a nicely composed page. What’s gone wrong is a different
story: Poor typeface choice aside, badly set type can fail aesthetically (it’s sloppy
or unattractive) or practically (it makes reading harder), but it can always be
counted on to make a bad impression.
Legibility and Readability
- Bad typesetting can stymie a reader almost as much as bad writing.
- Legibility refers to a reader’s ability to easily recognize letterforms and the
word forms built from them. (We don’t read by recognizing one letter at a
time, but by recognizing the shapes of whole words and phrases.)
- Readability
refers to the facility and comfort with which text can be comprehended.
- Text with good readability must also be legible, but mere legibility doesn’t make text readable. A book is much more likely to be a “page turner” if its type is pleasantly readable—badly set type wears a reader out.
Fig. 9.4 Example of Legibility and Readability
The third paragraph
here is noticeably darker than those
around it. Its tight spacing actually
makes it look overinked, and it
clearly has a different “color.”


Comments
Post a Comment